Monday, October 29, 2012

One Project Closer to Moving In.

Project #10: Painting the Exterior of the House

We were very fortunate that the house had a fairly new roof on it however the exterior paint needed a little sprucing up.  We felt like we should repair the most critical wood rot locations of the siding and window trim.  We did not address them all but made an executive decision to put off that project for when we felt like we wanted to replace all of the windows.  We really just wanted to get a fresh thick coat of paint on the entire exterior of the house prior to winter arriving and us moving in.  Yes that is correct we still have not moved into the house at this point in the renovation process.  We have owned the house for 9 weeks and it is the first of November 2010.
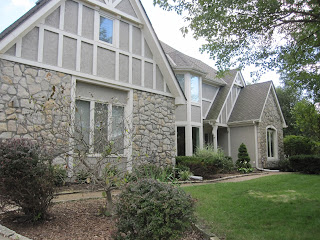
Before:


Lucky for us we happen to have a house painter in the family!  My Uncle Terry does house painting in the summer since he is a high school teacher so we called on him to lend his expertise and equipment.  So Matt repaired the critical wood rot locations around the house and we got to painting. Thanks to my Uncle Terry, Aunt Mary and my Dad we were able to get the entire exterior of the house painted including the trim in one weekend!  Thanks to all of our manual labor helpers including my cousin Will who stopped by for a few hours to lend a hand, we really appreciated it!
 
After:


Thursday, October 25, 2012

Painting, Painting & More Painting


Project #9: Painting of the Laundry Room, Hallways, & Bathroom

As previously mentioned the original owners of our house had a thing for the color purple.  We had repainted the dining room and kitchen to eliminate the purple but there were still more rooms that had other shades of purple in them.  The laundry room had plum purple walls while the hallway had lavender sponge painted purple walls, the main floor bathroom had a combination of different shades of purple sponge painted walls and the entry hallway had white with purple swirl wallpaperDon't worry this is still not the end of the purple madness, stay tuned for future posts.
 
Before:  


Oh and I have failed to mention the gorgeous purple, pink and teal stained glass windows as shown above on the side windows of the front door and below at the stair landing.


I bet you can't guess what color the front door was? Purple of course!
 
 
Construction:
 
The stained glass windows ended up being a pretty easy renovation.  They in fact were just single panes of leaded glass inserts behind the single pane windows.  So Matt simply pried them out and we cleaned up the windows.


After:
 
The main floor bathroom, we kept the original tile flooring.


The laundry room, we kept the original cabinets which were much nicer than the kitchen ones and the tile flooring.

The entry hallway, we kept the marble flooring.


I even got crafty and painted a chalk board on the wall in the hallway using chalk board paint and then Matt framed it out with trim.


No more stained glass!


This is hard to see but we painted the front door black.


Monday, October 22, 2012

Bella's Room

Project #8: Part 1 of the Screened in Porch

One of the features of the house that we feel in love with was the large screened in porch off of the kitchen.  Pretty standard construction with a concrete slab-on-grade floor, two walls shared with the exterior of the house and two walls of screens.  The roof slopes away from the house and contains two large skylights for additional natural light into the space.  This is also one of Bella's favorite rooms of the house.
 
Before:


Screened in porch in the right hand corner of the photo.


My parents had recently added a stained concrete patio to their house so they offered to stain the concrete floor of the screened in porch.  We cut the concrete slab to give the appearance of tile and then my parents stained the concrete.  

Construction:


The floor no longer looks like a boring grey concrete slab-on-grade but instead gives the appearance of a tile floor. Thanks Mom and Dad!    
 
After: 


Friday, October 19, 2012

Bye Bye Black & White Checker Tile

Project #7: Kitchen Fireplace

After a few large projects it was always nice to just squeeze in a little one here and there that could be completed in a few hours.  That was the case with the fireplace in the kitchen.  The art deco black and white checkered tile surrounded the fireplace and with all the upgrades to the kitchen it also needed to be updated. 
 
Before:
 
 
We decided to go with a black marble tile that matched the fireplace in the living room.  For some reason the fireplace was missing a mantel so Matt built one to finish off the look.
 
Construction:


After:


Thursday, October 18, 2012

Another Purple Room Bites the Dust

Project #6: Kitchen Cabinets

As previously mentioned the black and white kitchen cabinets continued in the art decor theme.  They had rounded corners and were made of particle board with plastic hardware.  Not exactly high end, so they had to go.
 Before:


Demolition of the cabinets went hand and hand with the floor because all of the base cabinets were set into the 2" mortar bed of the floor.  Therefore we had to physically destroy the base cabinets to get them out of the kitchen. 
 
Demolition:


Once all of the cabinets were removed Matt patched all of the sheetrock and we painted over the existing purple sponge painted walls.  Matt also added a new knee wall between the dining area and the kitchen which would form the breakfast counter.
 
Construction:


Once the walls were finished we then assembled the new kitchen cabinets.  We purchased them online based on a layout I designed and then assembled them once they arrived.  Then Matt with a little help from his dad hung them.  Thanks again Steve! 


You will notice we changed the layout of the kitchen a bit. We squared off the island and removed the stove top from it. We also swapped the location of the stove and the refrigerator. We went with all gas appliances which required us to run a larger gas line into the house because the original one was undersized to begin with. We called in a professional to do this portion of the project. No need to blow up the house.


Now that the cabinets were installed Matt installed the back splash.  We removed the 1980's track lighting above the island, replaced the lighting fixture in the dinning area and installed lighting above and below the cabinets.  We went with concrete counter tops which were poured off site and then brought to our house and installed. 
 
After:


We were able to have the mini bar sink cast-in-place within the counter top by going with the concrete.