Once Phase II of the basement was completed it quickly became necessary for the Final Phase to be completed. You see our loyal patrons were enjoying all aspects of Phase I & II however with the installation of the beverage refrigerator and kegerator in Phase II it quickly became an annoyance to have to walk all the way upstairs to the main floor to use the restroom. Therefore construction of the bathroom in the basement began.


Construction:
The first step was to dig up the slab-on-grade to locate the waste line and install new drains and waste lines for the sink, toilet and shower. Luckily the main waste line for the house went straight down the back wall of the bathroom so it was just a matter of finding it once it went below grade to tie into. We originally thought this process would require a jack hammer and excessive noise and dust, however I came home from work one day to find that Matt had already broken out the slab by hand. He then taped out exactly where the new waste lines needed to go in order to tie into the existing waste line below grade and continued breaking out the concrete in order to install the new plumbing lines.


Matt then installed the new plumbing lines and poured back the floor. Followed by sheetrocking the storage closet under the stairs and installing the 2x stud walls.


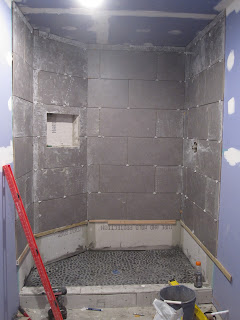
Next Matt completed the 2x studs for the shower and installed insulation as well as the remainder of the plumbing within the walls. He then began installing the sheetrock. You will notice it is purple, just to go along with the theme of the house! Ha Ha not really it is the mold resistant sheetrock.


Then Matt poured the shower pan. This consisted of framing it out of 2x studs then installing the waterproofing barrier and pouring in the floor of the shower sloped to the drain.


The waterproofing membrane was carried up the walls and then the cement backer board was installed in the shower. We also hung the sheetrock on the ceiling and the remaining walls after Matt completed the electrical work and the vent installation.


Next Matt installed the river stone pebble tile floor for the shower. We have been very happy with our master bathroom shower floor so we decided to go with this material again just in a different color.


Then came the tiling of the shower walls. We went with 24" x 12" rectangular porcelain tiles in a horizontal brick pattern. Matt also built an inset shampoo and soap shelf within the wall.

Then the floor tiling which is the same tile we used on the floor of the bar.

Once all of the tile set up in the mortar bed the grouting was completed.

Matt completed muding and sanding the ceiling and wall sheetrock, got it all primed and then painted.


Finally Matt installed the vanity, toilet, fixtures then painted and sealed everything.
After:


The blog is now currently up to date as of 12/26/12 with the completion of Project # 19. It is amazing the amount of work we have accomplished in only a 2 year time span. The purple foreclosure we embarked on back in August 2010 has had quite the face lift. Stay tuned for future projects.
No comments:
Post a Comment