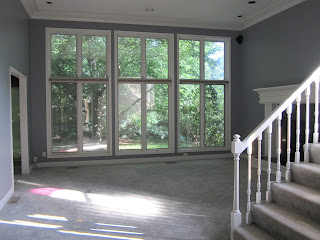
In addition to the excessive amount of purple in the house the previous owners also liked black and white. The kitchen, dining area, sitting area, laundry room and main floor bathroom all had black and white checkered flooring. The fireplace in the sitting room, the mini bar and the kitchen back splash also had black and white checked tile. This in combination with the black and white kitchen cabinets and purple walls was a bit overwhelming. Not to mention the decor resembled something out of the movie Scarface.
Before
The kitchen with it's black, white and purple art deco theme.
This is not a very good picture but the laundry room not only had black and white tile but also plum walls.
The formal living room had purple carpet.
The living room had light purple/grey carpet.
The dining room carpet as previously posted.
Prior to installing the new flooring we had to remove the existing flooring. This was pretty easy in the formal living room, living room and dining room because it was just a matter of tearing out the carpet and pad then pulling out the tack strips and random staples.
Demo:
We quickly found that the kitchen, dining area and sitting area were not going to be as easy to remove the tile flooring. Apparently in the late 1980s they did not install tile flooring the same way we do today with a thin layer mortar bed to set the tiles in followed by grouting between the tiles to secure them. Instead they would recess the sub floor (floor joists and plywood sheathing) 2" in order to lay a 2" solid mortar bed reinforced with heavy gage wire mesh. Then the tile was set in this mortar bed and grouted. We attempted to break and pry the tiles with a number of tools including crow bars, hammers etc and nothing seemed to work. We could get small pieces up of tile but were making no progress on the mortar or wire mesh. Then Matt got the idea to use his circular saw with a diamond blade on it to cut the floor up into 2'-0" x 2'-0" or smaller pieces. This not only cut through the tile but also the 2" mortar bed and even the wire mesh. This was really the largest size pieces we could cut because of the shear weight of the flooring. Concrete weighs 150 lbs per cubic foot, so 150pcf x 2" (1 foot/12 inches) thick x 2'-0" x 2'-0" = 100lbs. Removing the existing flooring was not only a workout but you also had to be careful because once the wire mesh was cut it became incredibly sharp. However we kept with it and filled our second 40 yard dumpster.
Now that demolition was completed on the existing flooring we first had to build up the 2" recessed kitchen, dining area and sitting area to be flush with the sub floor in the living room and dining room. This was done by installing (2) layers of 1" plywood. Once this was completed Matt then began installing the 3/4" thick solid walnut hardwood flooring.
Construction:
By shear determination Matt installed about 1,500 square feet of flooring in under 4 days!!! At this point I should point out that throughout all of our renovations we only worked weekends and after work during the week. No vacation or sick days were used for renovations.
After:


No comments:
Post a Comment